Deploying your first model with Matcha
In this guide, we'll walk you through how to provision your first machine learning infrastructure to Azure, and then use that infrastructure to train and deploy a model. The model we're using is a movie recommender, and we picked this because it's one that beginners can get up and running with quickly.
There are two ways to interact with Matcha; via the CLI tool, or through the API. Throughout this guide we'll demonstrate how to get started using either method.
There are five things we'll cover:
- Pre-requisites: everything you need to set up before starting.
- The movie recommender: downloading the example code and setting up your Python environment
- Provisioning: Using Matcha to provision your infrastructure
- Sharing Resources: Sharing resources with other people
- Training and deploying: training a model on your provisioned infrastructure, deploying, and testing it
- Destroying: tearing down provisioned infrastructure
The movie recommender is one among several of example workflows that we've made available on Github; you can view all our examples here.
Note: Matcha is still in alpha release. While we've worked hard to ensure there are no defects, there's a small chance that you'll find a bug or something that hasn't been documented as well as it could be. If that happens, we'd really value your feedback, which you can send by submitting an issue to Matcha on Github.
Pre-requisites
An Azure cloud environment
Matcha uses Azure to provision your infrastructure, so first you'll need to set up a Microsoft® Azure account.
Tools you'll need
Next, you'll need to install a couple of things.
- Python 3.8 or newer, along with Virtual Env and PIP.
- The Azure command line tool. Instructions on installing this can be found here.
- Docker. This is used to build images locally, before running them on Azure. Instructions for installing Docker can be found here. The Docker daemon will need to be running on your system.
- Terraform. We use this to provision services inside Azure. You'll find installation instructions for your platform here. We recommend version 1.4 or newer.
The movie recommender
Matcha has an examples repository on Github, and that's what we'll be working from in this guide. There are a number of different examples in that repository, but we'll focus on the movie recommender. Note, however, that all the examples have been designed to work in much the same way as this one.
Start by cloning the examples repository:
git clone https://github.com/fuzzylabs/matcha-examples.git
Then, enter the recommendation directory and set up your Python environment:
cd recommendation
python3 -m venv venv
source venv/bin/activate
Now, let's install Matcha:
pip install matcha-ml
You can test that your installation is working by running
matcha --version
Which should reply with something like Matcha version: <version number>.
Now you're ready to provision your infrastructure.
Provisioning
Using the Azure CLI, you will need to authenticate:
az login
When you run this command, you'll be taken to the Azure login screen in a web browser window, and you'll be asked if you want to allow the Azure CLI to access your Azure account. You'll need to grant this permission in order for Matcha to gain access to your Azure account when it provisions infrastructure.
Note: you'll need certain permissions for Matcha to work. If you're unsure, you can run
matcha provisionand if your Azure account is missing the required permissions, theprovisioncommand will tell you. For specifics around permissions, please see our explainer on Azure Permissions.
Next, let's provision:
CLI:
matcha provision
Note: users have the choice of passing optional arguments representing the location, prefix, and password parameters by using '--location', '--prefix', or '--password'. For example;
--location uksouth --prefix test123 --password strong_password.
API:
import matcha_ml.core as matcha

matcha_state_object: MatchaState = matcha.provision(location="uksouth", prefix="test123", password="strong_password")
Initially, Matcha will ask you a few questions about how you'd like your infrastructure to be set up. Specifically, it will ask for a location for your infrastructure, a prefix to deploy it to. Once these details are provided, Matcha will proceed to initialize a remote state manager and ask for a password. After that, it will go ahead of provision infrastructure.
Note: provisioning can take up to 20 minutes.
Once provisioning is completed, you can query Matcha, using the get command:
CLI:
matcha get
You should have something similar to the following output:
Cloud
   - flavor: azure
   - resource-group-name: example-resources

Container registry
   - flavor: azure
   - registry-name: crexample
   - registry-url: <url>

Experiment tracker
   - flavor: mlflow
   - tracking-url: <url>

Model deployer
   - flavor: seldon
   - base-url: <url>
   - workloads-namespace: matcha-seldon-workloads

Orchestrator
   - flavor: aks
   - k8s-context: terraform-example-k8s

Pipeline
   - flavor: zenml
   - connection-string: ********
   - server-password: ********
   - server-url: <url>
   - server-username: ********
   - storage-path: az://<path>

Data version control
    - flavor: FLAVOR
    - connection-string: ********
    - account-name: <account_name>
    - container-name: <container_name>
You can also use get to inspect specific resources, for example:
matcha get experiment-tracker
With the following output:
Below are the resources provisioned.

Experiment tracker
   - flavor: mlflow
   - tracking-url: <url>
Note: You can also get these outputs in either json or YAML format using the following:
matcha get --output json
By default, Matcha will hide sensitive resource properties. If you need one of these properties, then you can add the --show-sensitive flag to your get command.
API:
import matcha_ml.core as matcha

matcha_state_object: MatchaState = matcha.get()
As with the CLI tool, users have the ability to 'get' specific resources by passing optional resource_name and property_name arguments to the get function, as demonstrated below:
import matcha_ml.core as matcha

matcha_state_object: MatchaState = matcha.get(resource_name="experiment_tracker", property_name="flavor")
Note: the
get()method will return aMatchaStateobject which represents the provisioned state. TheMatchaStateobject contains theget_component()method, which will return (where applicable) aMatchaStateComponentobject representing the specified Matcha state component. In turn, eachMatchaStateComponentobject has afind_property()method that will allow the user to be able to access individual component properties.
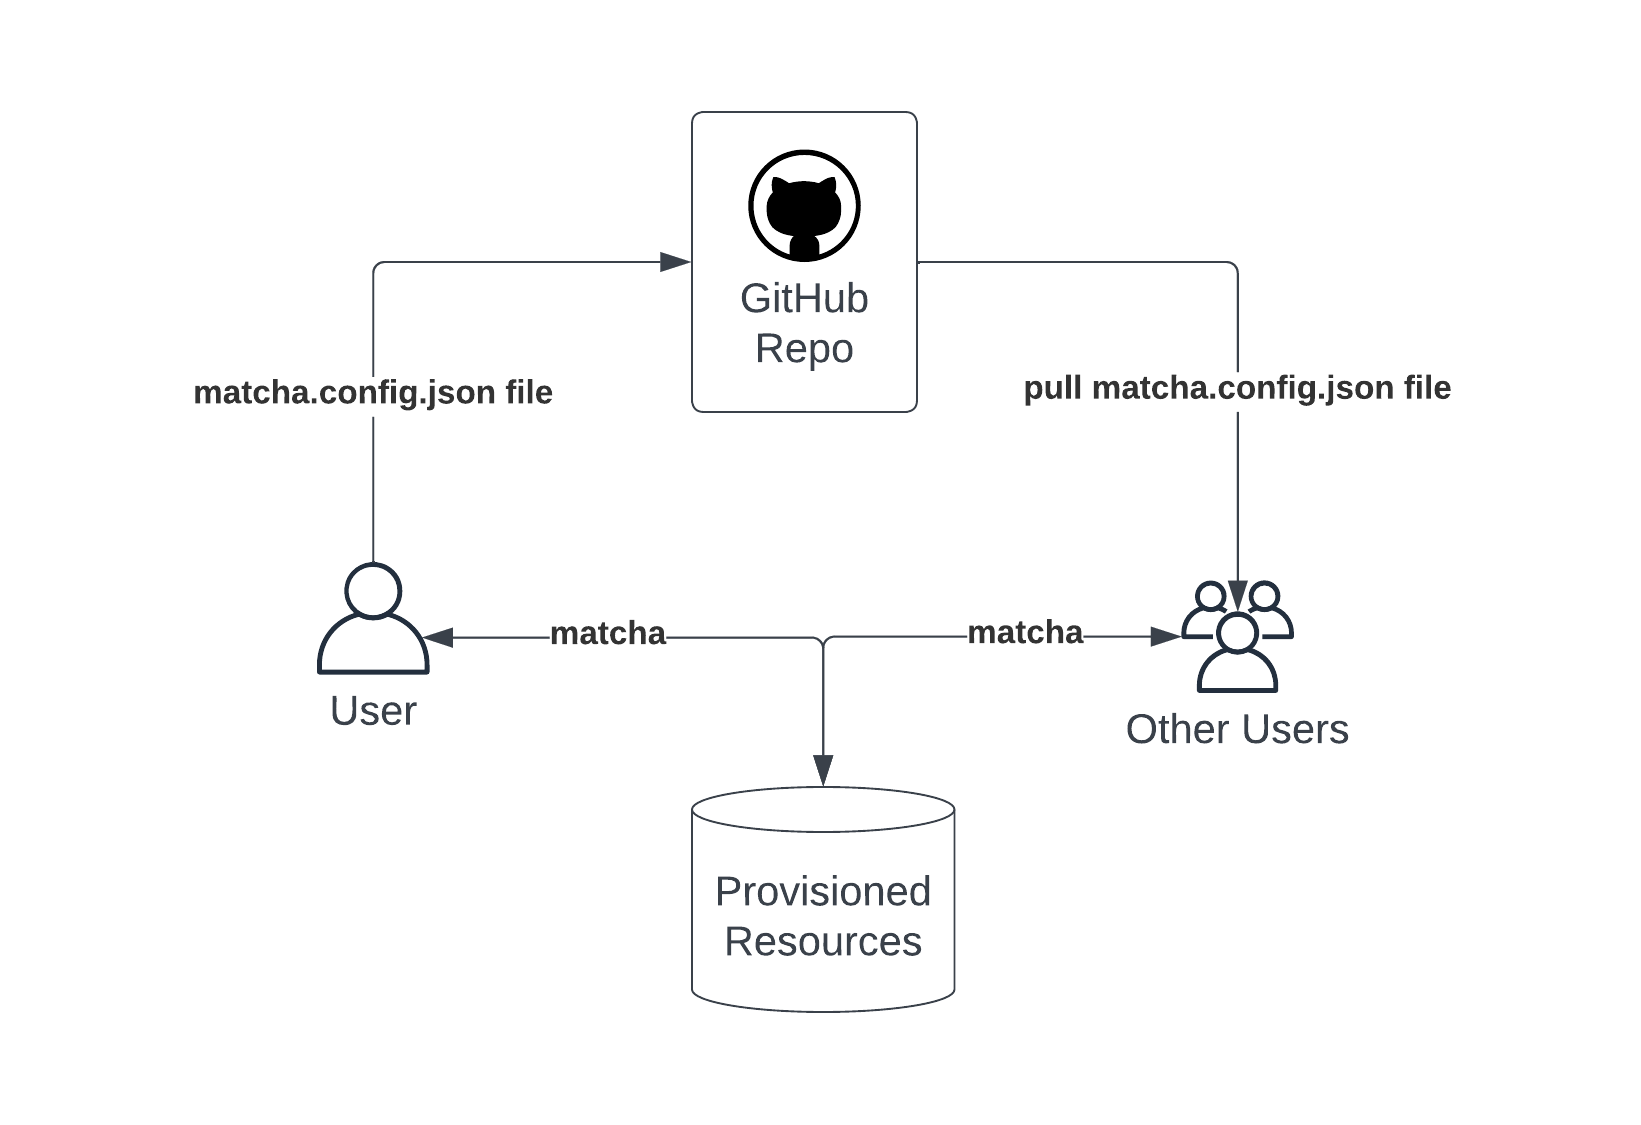
🤝 Sharing resources
You'll notice that a configuration file is create as part of the provisioning process - it's called matcha.config.json. This file stores the information necessary for Matcha to identify the resource group and storage container that holds the details of the provisioned resources.
When Matcha provision first runs, it creates a storage blob in Azure which holds details of the provisioned environment. For more detail, please see our Inside Matcha > How does Matcha work section.
In order to access your provisioned resources, other users will need to ensure this configuration file exists locally, in the same directory where the file was originally created. We suggest that the matcha.config.json file be included within the project repository and shared using GitHub or similar repository hosting tools. The user will also have to:
- Set the active Azure subscription to the one that contains the resource group.
- Ensure they have access to both the resource group and the storage bucket.
Note: the shared file does not contain any sensitive information such as passwords or server endpoints.
Matcha uses this file to find and pull the provisioned state information, which will allow multiple users to use the same provisioned resources.
Training and deploying
Now that you've reached this point, you'll have provisioned the following infrastructure into Azure:
- The MLFlow experiment tracker and model registry.
- Seldon for model deployment and serving.
- A ZenML server. This example uses ZenML for defining and orchestrating the training and deployment pipelines.
- Kubernetes. This has two roles: firstly, it's where the training workload actually runs, and secondly it's the deployment environment for all of the above components.
- A storage container for versioning and storing data. For details on how to set this up, see here.
Setup
Setting up
Before you can train the model, there's a little setup to do. We've provided a convenient script that does this for you:
./setup.sh
You might wonder why this setup step is necessary, and what it's doing. While you've already set Matcha up, the code that will train the model needs to know a few things about your infrastructure before it can run. As you've seen, matcha get is what's used to query information about your infrastructure. Under the hood, the setup script for the movie recommender model actually invokes matcha get to find out everything it needs to know. Additionally, this script installs some Python dependencies that are specific to the machine learning task that we're working with; crucially, the Surprise library, which is part of Scikit-learn, which we're using to do the recommendation bit itself.
Training
Once the setup script completes, you're ready to train the model:
python run.py --train
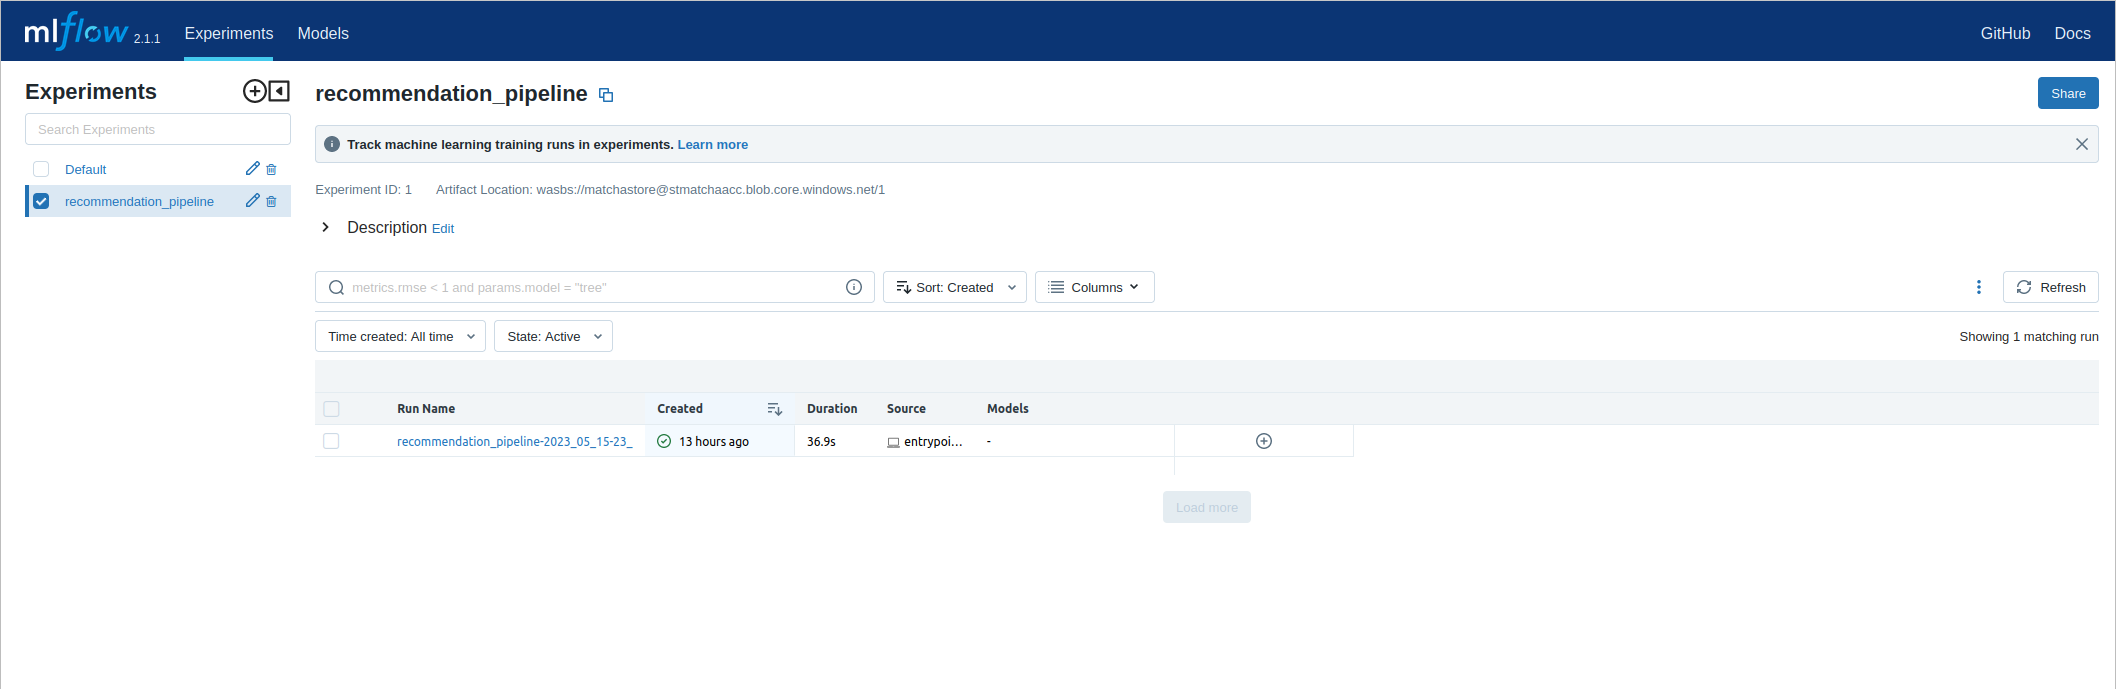
Experiment tracking
Training won't take too long. After it finishes, you'll be able to view the details of this training run in MLFlow. First, look up the URL to MLFlow:
matcha get experiment-tracker
Copy the tracking URL into a web browser. Then, from the experiments pane on the left-hand side of the MLFlow interface, you'll be able to select recommendation_pipeline. Each time the training pipeline runs, it will be logged here, so you can view historical runs alongside important details such as the training parameters or the model performance.
Deploying
Your model has been trained, but we can't interact with it until it has been deployed. Alongside the training pipeline, the movie recommender example includes a deployment pipeline, which will result in the model being deployed to Seldon, and made accessible as a web service.
Run
python run.py --deploy
Once this has completed, you can test the model out. We've included a convenience script to help with this, called inference.py:
python inference.py --user 100 --movie 100
This will result in a score, which represents how strongly we recommend movie ID 100 to user ID 100.
Destroying
The final thing you'll want to do is decommission the infrastructure that Matcha has set up during this guide. Matcha includes a destroy command which will remove everything that has been provisioned, which avoids running up an Azure bill!
CLI:
matcha destroy
API:
import matcha_ml.core as matcha

matcha.destroy()
Note: that this command is irreversible will remove all the resources deployed by
matcha provisionincluding the resource group, so make sure you save any data you wish to keep before running this command.You may also notice that an additional resource has appeared in Azure called 'NetworkWatcherRG' (if it wasn't already there). This is a resource that is automatically provisioned by Azure in each region when there is in-coming traffic to a provisioned resource and isn't controlled by Matcha. More information can be found here on how to manage or remove this resource.